Shen Doragon (talk | contribs) m (→Terrain Preparation: h y d r a) |
No edit summary |
||
| Line 1: | Line 1: | ||
{{mod sub-page}}<!--DO NOT REMOVE THIS LINE! It is required for Mod sub-pages to work properly.--> |
{{mod sub-page}}<!--DO NOT REMOVE THIS LINE! It is required for Mod sub-pages to work properly.--> |
||
{{guide header|latest=1.0.3.2}} |
{{guide header|latest=1.0.3.2}} |
||
| + | |||
| − | {{Npc infobox |
||
| + | {{transclude infobox|selection=y}} |
||
| − | | imagealt = [[File:The Hydra (Ancients Awakened).png]] |
||
| + | |||
| − | | type = Boss |
||
| − | | environment = The Mire |
||
| − | | ai = Hydra AI |
||
| − | | damage = 40 {{expert|80}} |
||
| − | | life = 4,000 / {{expert|8,000}} |
||
| − | | defense = 10 |
||
| − | | knockback = 100% |
||
| − | | #Abyssium| 65-80 / {{expert|70-85}} | 100% |
||
| − | | #Hydra Hide| 57-71 / {{expert|65-75}} | 100% |
||
| − | | #The Hydra Trophy| 1 | 10% |
||
| − | | custom| {{item|#Treasure Bag (The Hydra)|Treasure Bag|note=(The Hydra)|wrap=y}} |
||
| − | : • {{item|#Hydra Pendant}}|{{expert|100%}} |
||
| − | | imageother = The Hydra Map Icon (Ancients Awakened).png |
||
| − | | imageothercaption = Map Icon |
||
| − | }} |
||
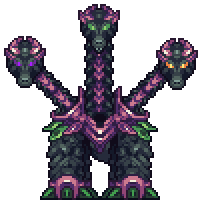
The '''Hydra''' is a [[Pre-Hardmode]] boss that is an alternate to [https://terrariamods.fandom.com/wiki/Ancients_Awakened/The_Broodmother The Broodmother] fought in progression. Compared to The Broodmother, The Hydra shows to be significantly more difficult. |
The '''Hydra''' is a [[Pre-Hardmode]] boss that is an alternate to [https://terrariamods.fandom.com/wiki/Ancients_Awakened/The_Broodmother The Broodmother] fought in progression. Compared to The Broodmother, The Hydra shows to be significantly more difficult. |
||
Latest revision as of 20:11, 4 May 2021
| This is a Guide page. This means the page will walk you through a specific task, strategy, or enemy/boss fight. |
| Type | Boss |
|---|---|
| Environment | The Mire |
| AI Type | Hydra AI |
| Damage | 40 80 |
| Max Life | 4,000 / 8,000 |
| Defense | 10 |
| KB Resist | 100% |
- Item (Quantity)Rate
- 100%
 Hydra Hide(Ancients Awakened) (57-71 / 65-75)100%
- The Hydra Trophy(Ancients Awakened)10%
- Treasure Bag(The Hydra)
The Hydra is a Pre-Hardmode boss that is an alternate to The Broodmother fought in progression. Compared to The Broodmother, The Hydra shows to be significantly more difficult.
Terrain Preparation[ | ]
The Hydra can always be fought in the bottom of the The Mire's cave, and does require some preparation. However, it is recommended that the player, if need be, should place down a campfire and heart lantern in the bottom of the volcano, alongside a few platforms, or even rope.
Gearing up[ | ]
Armor[ | ]
- Shadow armor/Crimson armor are great overall armor sets for any class at the halfway stage of the game.
- Viking armor may be a more preferable choice for melee users, due to its damage resistance and high defense.
- If the player has defeated The Broodmother before fighting The Hydra, Kindled armor is a great choice for all classes, but an excellent choice for melee users.
- Meteor armor is a very powerful choice for mages in the later stages of the game, if players are willing to get the meteorite for it.
- Ocean armor could be used as an alternative, for greater damage output at the cost of lower defense.
- Imp armor is a good choice for summoners, if they are willing to obtain the necessary materials.
Accessories[ | ]
- Lightning Boots are great for outrunning The Hydra. However, it is recommended the player stays somewhat close to The Hydra, as they can teleport to the player if they're either too far away, above the hydra, or behind a block.
- Cloud in a Balloon or any of its alternates are a significant help with maneuvering in the cave, and can help to avoid The Hydra's attacks alltogether.
- Shark Tooth Necklace can aid in damaging The Hydra by piercing its defense.
- If The Broodmother has been defeated before fighting The Hydra, the Dragontamer's Cloak may be a good option, but is severely overshadowed and outclassed by the almighty Worm Scarf.
- Bulwark of Chaos is an all around great option for dodging out of the way of attacks, ramming into The Hydra to avoid taking damage from contact damage, and getting in extra damage.
- Worm Scarf is, like the Bulwark, an all around great option, due to the insane damage resistance it provides.
Weapons[ | ]
Melee[ | ]
- The Enchanted Sword can help with attacking The Broodmother from a safe distance, although may be hard to obtain.
- The Starfury is also helpful for maintaining distance if players can get it.
- The Pyrosphere is great for hitting multiple heads at the same time, due to its ability to pierce.
- The Exile's Katana is an amazing source of damage to The Hydra's heads. It would be a good idea to pair this with the Depthwalker, or with the Incineration.
- The Depthwalker, when paired with the Exile's Katana, can be a good duo for fighting The Hydra, as it can hit The Hydra's heads from a distance; a great secondary to have when and if the player gets severely injured by The Hydra. It would be a good idea to pair this with the Exile's Katana, or with the Flaming Fury.
- The Flaming Fury is a good alternative to the Exile's Katana, due to it being able to inflict the On Fire! debuff. It would be a good idea to pair this with the Incineration, or with the Depthwalker.
- The Incineration is a good alternative to the Depthwalker, with considerably more damage, but a slightly slower use time, as it can hit The Hydra's heads from a distance; a great secondary to have when and if the player gets severely injured by The Hydra. It would be a good idea to pair this with the Flaming Fury, or with the Exile's Katana.

Ranged[ | ]
- The Demon Bow, when paired with Jester's Arrows, excel at hitting multiple heads at once, shredding through The Hydra.
- The Tendon Bow, when paired with Jester's Arrows, excel at dealing more burst damage than the Demon Bow, but with the downside of having a slower fire rate.
- The Musket, with its high damage, can do considerably good damage to The Hydra's heads.
- The Undertaker, with its high firing speed and moderate damage to The Hydra's heads, The Undertaker is a good alternative to the Musket.
- Hydra Fangs are a good source of piercing and damage against The Hydra's heads.
- The Star Cannon is a scarily good weapon against The Hydra, with its infinite piercing and incredibly high damage output. If the player has the stars for it, this could carry them throughout the entire fight.
- The Hydra Trishot is a good source of burst damage, but isn't the most accurate. It may be advised to stay moderately close to The Hydra when using this.
- The Dragon Flamebow is a debatably better alternative to the Demon and Tendon bows, as it is better in base use time, and can fire stronger arrows if the player decides against using Jester's Arrows.
- The Molten Fury, if the player can get Molten Bars before fighting The Hydra,is a much superior alternative to the previously mentioned bows, both in damage and fire rate.
Mage[ | ]
- Ruby Staff/Diamond Staff with their piercing properties and high damage can do quick, good damage to The Hydra's heads.
- Magic Flower is a decent overall option.
- Mana Blade is a good option for those who wish to primarily focus on dodging, as the homing projectiles of the Mana Blade can allow for a near entire lack of aim and focus, but lacks damage and piercing.
- Demon Scythe is a good option for fights in open areas like the surface, but, if the player fights in the cave, it may be hindered in its viability. Although, it still has its use in piercing The Hydra's heads and dealing good damage to them.
- Venom Spray is an amazing source of both piercing and debuffs, as it, much like the Golden Shower, fires an infinitely piercing stream of poison, inflicting the Poisoned debuff upon hit. Amazing for dealing damage to The Hydra's heads.
- Sludge Shot is a good source of burst damage, and explodes upon impact. Good for dealing damage to singular heads.
Summoner[ | ]
- The Demonite Staff / Crimera Staff are very powerful summons, even in this part of the game.
- The Hornet Staff is a good option if the player goes out of their way to get it.
- The Imp Staff, if the player can obtain it, is a good source of damage, considering that it can inflict the On Fire! debuff.
- The Hydra Staff is a great choice if the player is fighting in the cave, as it can be placed anywhere.
- The Claw Baton is an acceptable choice, if the player is either unable to get the previously mentioned staffs, or prefers them over the previous staffs.


The Fight[ | ]
The Hydra will remained grounded for the entire fight, being unable to jump, and having a slow walk speed. However, The Hydra makes up for this in its ability to teleport, its powerful ranged attacks, and that its body has defense comparable to that of a Dungeon Guardians.
The Hydra will shoot out explosive Hydra Chows, exploding upon contact. To avoid these, try to swerve around The Hydra, either by jumping over it with a Cloud in a Balloon, or by grappling over it with a hook and either some platforms or some blocks. If the player is unable to do either of these, it is suggested that they either use rope, or "jump and run like hell."
The Hydra, similar to The Broodmother, will spew "flames" out of one of its heads, acting much like a flamethrower. To avoid this, the previous strategies are suggested.
Upon the death of one of The Hydra's initial heads, it will divide into two more, and not any further. This, however, can be used against The Hydra. A possible strategy for taking out the heads could be to take out the initial three heads first, then using a weapon with either high or infinite piercing to kill the remaining six. A debatably easier strategy is to take out each initial head and its duplicates one at a time, as it may prove more conventional.
General Tips[ | ]
- The Hydra is a slow opponent, so while it is not required that the player uses speed-boosting accessories or tools, it is still suggested.
- It is recommended that you have at least have 1-2 rows of platforms, as to be able to better maneuver The Mire's cave, and to better dodge The Hydra's attacks in general.
- If the player does not have a cloud in a bottle, a Grappling Hook is a good alternative, if the player knows how to use properly.